Pages

Thursday 27 August 2015

Back to Basics/Keeping it Simple

I couldn't decide on the title for this blog post because really both are true.  I have had a long dry spell of creativity, not been able to get motivated to melt glass, sew or crochet.  I really hate times like that, when sometimes confidence and motivation sinks so low I start to think about selling up my kit.  Of course I never would, my torch and associated bead making kit feel like an extension of myself.

I have had sessions at the torch but I've been trying too hard to make complicated designs and then getting disheartened at the results.  I know that when it comes to bead making its all about practice and its not often a new design works first time.  However,  it takes real effort to remember this fact when feeling frustrated.  Therefore, the title 'Keeping it Simple' is apt, stripping back all the frippery of dot placement and just thinking about colour combinations and shape.  And so, 'Back to Basics is also fitting as it is the basic balanced bead that I aimed to achieve when starting out.  The resulting beads from my last session at the torch were these:


The only 'fancy' thing about some of these beads is that I added some fine silver wire.  I had a great time just focussing on getting evenly shaped beads and using my different sized mandrels.  I then went on to create some jewellery continuing the 'keeping it simple' theme.  The necklaces are threaded onto cotton cord or leather and have a bead and loop fastening.


I started to get a bit more experimental with the bracelet design and it is a work in progress
The plan now is to have a similar session with a different colour scheme and this might well become a 'collection'.....  Then, in time, the more intricate designs will creep back in.

Monday 11 May 2015

April ABS Challenge

This painting is called 'Self-Portrait with Thorn Necklace and Hummingbird' by Frida Kahlo,this is the painting chosen for the April ABS Challenge, you can read about the artist and the painting here.  I have to fess up now and tell you that I didn't manage to produce a piece for April!!  Walks away with head bowed in shame.  I did make a bead but I wasn't at all happy with it, I might get around to photographing it for you.  Truth is my mojo went for a serious walkabouts, in fact I would say it went on holiday for practically the whole month of April.  I don't know why it happens but sometimes I just can't get motivated to get in the workshop and make.  All is not lost, I can come back to this painting and perhaps get inspired another time.  There are some amazing pieces and beads inspired by this painting, you can find them on the ABS Pinterest Board.

I did however, treat myself to a bead or two during the month of April.  I bought:
Fisherman's Cottage Bead - Pink, polymer clay house bead Fisherman's Cottage Bead - Turquoise, polymer clay house bead  Little Love Shack Bead, polymer clay house bead
Three cute houses and set of large faceted beads from Ditsy Blue

Some gorgeous  ceramic pieces from Round Rabbit but unfortuately I don't have pictures I can share at the moment.  I also bought some stunning ceramic beads made by Golem.  I have lusted after some Golem beads since I saw some used in a project in Lori Andersen's' Bead Soup Party' book.  They are currently being stocked in the UK by Buttoned Up Beads Extra 

Here is what I have made so far:

The earrings and bracelets feature my own wirework using inspiration from Cindy Wimmer's The Missing Link  I am really pleased with how these turned out and I'm hoping to make a stock of the ear wires, headpins and links to sell in my Folksy Shop soon.

The necklaces are strung onto long leather thongs which can be tied to the desired length with each wear.


The painting for the May ABS Challenge is this one by Augustin Lesage an oil on canvas piece.

I love the symmetry and the colours, the blue and lilac colours are so eyecatching.  Everytime I look at this piece I see something else.  I'm really looking forward to seeing how this painting inspires the makers over on Art Bead Scene.

Friday 27 March 2015

ABS March Challenge

Ok, so its now month three and so far so good, I might be past the deadline for the Art Bead Scene round up but sometimes its just the taking part that is important.  I am really enjoying these challenges as a way of using colour pallettes that I wouldn't necessarily choose, and also I get to see paintings I wouldn't otherwise see.
When I first saw this painting I was imediately drawn to the totem poles and I had visions of creating some in glass.  Take a look at these beautiful polymer clay totem poles by Leah Curtis.  However, I ended up taking inspiration from the colour pallette.  I set out with making a selection of beads using a base of sky blue and grey, which I then rolled in some frit.  Unfortunately I didn't take a shot of the beads before I used them but this pic will give you an idea of how they turned out.


I also decided to take a little look at Lesley Watt's shop.  I bought a pair of leaves because I could imagine finding them on the floor if I were able to step into the picture, and a pendant which I thought evoked the Native American Indian theme of the painting conveyed by the totem poles.

 I ended up making a pendant of stacked beads to reflect the totem pole theme using colours from the colour pallette.  I also wanted to add some fringing because when I think of indians I think of feathers and tassels, so I added some fringing to the leather cord and this is how it turned out.


To see what others came up with take a look at the Art Bead Scene blog at the end of the month.


Monday 16 March 2015

Abit of this and that.

I have been meaning to write a little post about my ear wires, some of you who are 'likers' on my Facebook page will be familiar with my 'dipping of the toe' into selling them. 


I should give credit here for the inspiration behind them.  I bought myself Cindy Wimmer's 'The Missing Link' a good few months ago.  It is a lovely book brimming with techniques to spark the creative flow.  The instructions are clear with great pictures.  I was practising the lightbulb technique when I had a lightbulb moment, this shape would make a great ear wire, and hence the 'Coiled Ear Wire' was born. 


Here is what I have done with the ear wires, my 'Earthy Earrings'.  These are made using my handmade glass discs which I have etched for a matt finish, knotted with Irish waxed linen and decorated with seed beads and ceramic washers.
They are amazingly light to wear.


 In other news I have this pendant to share.  I am undecided as to whether to offer this one for sale or keep it for myself.  It is made from a polymer clay leaf and flower from Pips.  The lampwork disc and bead are my own, the metal beads are from Smitten as are the little green rondelles on the top.  All knotted onto C-lon with a macrame bail.  I think this would look great hung on some leather thong.


 My project for this week is to work on the Art Bead Scene March Challenge.  I have already ordered some gorgeous ceramic pieces from THEA Elements and I would love to be able to translate the totem poles into glass.  We will have to see whether there is any success with that one. 


I almost forgot, a massive WELL DONE has to go to the group involved in the I'm So Good I'm Smitten  charity auction in aid of Macmillan Cancer Support.  We achieved a whopping total in excess of £1,700 not bad for a bunch of beads and a stack of talent.

Until next time, be creative.


Friday 6 March 2015

Going to the Auction!

I belong to a jewellery group called I'm So Good I'm Smitten, we did a charity auction in aid of Alheizmer charity.  The auction was such a success raising over £1,000 that we decided to run another auction this time for Macmillan Cancer Support. 

The format is to purchase a bead pack from Claire at Smitten Beads, to make as many items as you wish and then to put as many fo those items as you wish into the auction.  I purchased the Lavendar Woodbine mix.

LAVENDER WOODBINE MIX
This is what I made;
 As you can see I didn't use alot of the pack, I struggle with the large faceted beads.  However, I added a dash of Blue Kiln Beads lampwork discs and a button. 

The auction is open follow this link https://www.facebook.com/SoGoodImSmitten/photos_stream it is very easy to place your bid, simply put it in the comments box.  We are running the auction in good faith that all winning bidders will pay their bids, so please only bid if you are serious about paying.

I can't wait to see how it goes.....

Saturday 28 February 2015

ABS Feb Challenge

The Art Bead Scene challenge for February was a beautiful painting by Edward Detmold, so alive with movement as the poppies are caught by a breeze and the butterfly takes off from the petal. 

When I first saw this picture I had evisaged a floral focal bead in the style of Jacqueline Parkes with some red floral cane and some leaf cane.  Alas, my beadmaking skills fall short of my fantasy bead so I decided to go with the colour pallette for inspiration.  I should say at this point that the earrings bottom right aren't as blue in real life as they have come out in this photo.  I made some disc beads which I then etched to get the matte finish.

The bracelet has a large quantity of beads from Smitten beads.  The brass clasp was a gift from the lovely Linsey and the ivory spacer beads are some I made.

I made the ear wires using a tecnique I learnt from Cindy Wimmer's 'Links' book.  The pink and red beaded beads are my own using beads from Smitten and the disc beads are also my own.

If you would like to see what others have created pop over to the Art Bead Scene blog.

I wonder what the next challenge picture will be.  Speaking of challenges I have also taken part in the Smitten Beads charity auction which this time is in aid of Macmillan Cancer Support.  More about that in my next post.

Saturday 31 January 2015

Art Bead Scene Jan Challenge

One of the things I have decided to take part in for 2015 is the Art Bead Scene Challenge.  If you are not familiar with Art Bead Scene it is well worth taking a look.  It is a blog run by art bead makers and users and there is always something to learn.

One of the features on the blog is a monthly challenge whereby a piece of art is displayed for the month to use as inspiration for bead and jewellery design.  

This piece is called 'Imagine Tomorrows World' (orange version), 1998 by Friedensreich HundertwaserI had to look at the picture a couple of times before deciding how I was going to tackle it.  There is quite alot going on in terms of shapes but I decided to go with colour.  I couldn't choose between the black dark section and the brighter orange so I made two beads.  The orange won the day with black being used for the cord and connector ring.  The words in the title of the piece inspired the sputnik type shape.  All in all I am quite pleased with how this one came together.  Can't wait for the Feb challenge.

January Component of the Month with Art Jewelry Elements


There is a blog I like to follow called Art Jewelry Elements and each month they have a giveaway.  Imagine my excitement when I received an email from Linda Landig telling me that I had won the component that she had donated to the January challenge!

Before I reveal  what I made and explain how I put it together, I have a little story to tell.  I spent most of December telling myself that it will take a while for my component to arrive as it was Christmas so postal services were busy and Linda lives in the states so my prize had a way to travel.  I waited very patiently, eagerly checking the mail daily.  Mid-January arrived and I couldn't wait any longer so I contacted Linda to let her know I hadn't received anything. 

Linda was upset to hear that I hadn't received the component and very kindly offered me a replacement.  I was upset to not be able to take part in the challenge.  So, I had a little sulk then came to terms with the disappointment.

Fast forward a couple of days, I was just arriving home from work.  A lady wandered onto my drive with two beautiful dogs, one of which is an irish Wolfhound!  She asked if my house was number 71 and was my name Yvette to which I answered 'yes'.  She then proceeded to take an envelope from her bag and launched into an explanation of what had happened.  This lady also lives at number 71, different street obviously, AND she happens to make jewellery.  So, when an envelope turned up with 71 on it, from the states she just opened it up thinking it was something she ordered.  Not until a day or two later did she realise that the package was not hers.  With the hectic festive season and then illness she hadn't managed to try to track me down until last week! Am I glad that she went to the effort to find me!  I should say at this point that the lady in question is Sue of Visionari, she has beautiful artwork and jewellery for sale.

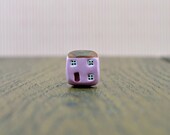
This is the piece that I won!  Isn't it stunning?  I had some ideas swimming arouund in my head while waiting for it to arrive.  I had thought I could make a macrame necklace using ivory and what little amount of neutral toned beads I have.  The brief was to bust some stash so no buying more beads.  However, when I fnally got my mitts on it I decided that too many beads would totally detract from the beauty and rustic feel of the piece.


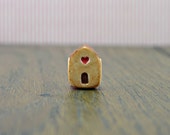
This is what I made.  It looks kind of simple and I didn't bust much stash in the end.  To be honest, I would have been happy to have the pendant on the leather with nothing added but where is the challenge in that?

I did find this a bit of a challenge.  My usual colour pallette is much more vibrant and I was resisting the urge to make anything too busy reminding myself that in this case less is more.  However, I was under a tight timescale and after having this sitting around as a mock-up for a couple of days I decided to go with it.

The lampwork glass disc and the purple etched bead are my own creations.  The other beads are from Smitten Beads.  I made a macrame bail using some C-lon cord with some little pink beads to finish the ends.  The pendant is threaded onto a long piece of leather thong which can be knotted at the desirable length for easy wear.

I hope you like what I made.  Many thanks to Linda for a gorgeous pendant.  I hope to be able to take part again sometime.  If you would like to see what the others made please follow the links below.

AJE team: 

Guest Participants ( aka winners)
Samantha- Wescott Jewelry
Nikki - Silver Nik nats
Yvette - Blue Kiln Beads


Bonus participants! 

Friday 23 January 2015

New Year = New Diary

I've had a Filofax for a long time but for the past couple of years I have bought a diary feeling that my Filofax is a little boring.  While being off work I have been surfing the net, especially Youtube, looking at art journals which led onto looking at how others use their planners/Filofax.  This resulted in a little Filofax makeover.  I have lots of scrapbooking papers and a beautiful set of Project Life Olive Edition papers, so I gathered my glue, my old Filofax diary dividers and set to.

 Ta da!  I am so pleased with how they came out.  I didn't take a before shot but they were a very boring cream card.  The one mistake, you may have spotted it, is that the August card is covered on the wrong side.  I got abit carried away and by the time I noticed my error the glue had dried.  I need to rectify it by adding more paper on the correct side but that can wait.

I also have a penchant for washi tape and something I saw during my surfing sessions was the use of Washi tape on the edge of pages to beautify a book.  My Filofax is the personal size, its small enough to fit into a handbag and is great as a calendar size but sometimes the pages are too small for jotting lots of notes and ideas when out and about.  I decided to make some pages that would let make more notes on a page.
A piece of lined paper with a piece of plain paper and I could, if this isn't large enough, add another sheet which can concertina and fold in.  I just love the colour the washi tape edges give.
Another nifty tip I picked up is using the little pockets you can get for Filofax as mini stationary cases.  I decided to use the credit card holder to hold some mini post it notes.


Oh yes, and a new pen was required.  I couldn't resist this pen and pencil set from Whsmith, they fit perfectly into the pocket.

If you have been inspired to update and breathe abit of life into an old Filofax/planner here are some links

http://www.nadiavdmescht.co.za/2013/07/filofax-love.html

http://www.abowlfulloflemons.net/2013/08/my-filofax-organization.html

Here's to a colourful and organised 2015.